Dec 05, 2009
I don't quite remember how I came across Atmel AVR microntrollers. Pre AVR days consists of handyboard, then some PLC kits, then a Basic Stamp kit, a smudge of embedded Linux somewhere in between, and finally the AVR days arrived. The concept of automation was always in the back of my mind but all of above ventures ended up gathering dust somewhere. Running Linux made things a bit more challenging, often beyond my meager skills and my short 30 seconds.
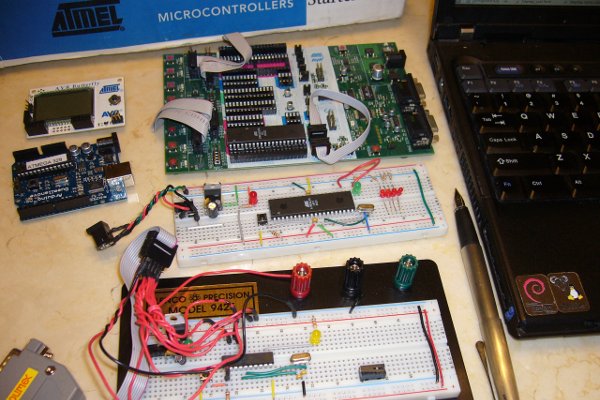
This image pretty much shows my tortuous and slow progression through various AVR incarnations. I started with STK500, then the C Programming Book for Microcontroller base on the AVR Butterfly, then Sparkfun's tutorials using the ATMega16, then a one day affair with Arduino through The Public School's Practical Electro-Mechanical class. Finally, with reprap generation 3 motherboard powered by AVR, I am going through Sparkfun's tutorial again but this time kind using the less expensive ATTiny2313. It's the least expensive AVR microcontroller with the external oscillator capability. Looking back I wish I had discover AVR sooner. It seem to be the least expensive but most versatile option.
Hopefully all the puzzle pieces will converge one of these days. . . .
Dec 04, 2009
 The laborious task of kitting together the Stepper Motor Driver V2.3 is done. Though I just discovered that Stepper Motor Drive V3.0 is in the works. It looks like the stepper motor driver IC will be changed from Allegro A3982 to A3977. I haven't progressed far enough in my microcontroller circuit building to understand the different but a quick search says something about A3977 gives a 25% increase in peak current. The cost for Stepper Motor Driver V2.3 is as follows.
| Part Name | Qty | Vendor | Vendor Part No | Cost | Ext Cost |
| .156” 4 position housing | 1 | Mouser | 538-09-50-3041 | 0.250 | 0.25 |
| .156” crimp-on connector | 4 | Mouser | 538-08-52-0072 | 0.080 | 0.32 |
| .156 header | 4 | Mouser | 538-26-48-1245 | 0.084 | 0.34 |
| .22uF ceramic capacitor 1206 | 1 | Digi-Key | 339-1251-1-NDD | 0.143 | 0.14 |
| 0.25 ohm resistor 2512 | 2 | Digi-Key | CSRN20.25FICT-ND | 0.608 | 1.22 |
| 10 pin IDC connector | 2 | Digi-Key | 609-1839-ND | 0.710 | 1.42 |
| 10 pin IDC header | 1 | Mouser | 649-75869-101LF | 1.030 | 1.03 |
| 100nF ceramic capacitor 1206 | 5 | Mouser | 80-C1206C104K5R | 0.070 | 0.35 |
| 100uF electrolytic capacitor D55 | 2 | Digi-Key | 493-3209-1-ND | 0.867 | 1.73 |
| 10k ohm resistor 1206 | 1 | Mouser | 290-10K-RC | 0.050 | 0.05 |
| 10k trimpot | 1 | Mouser | 72-T70YE-10K | 0.740 | 0.74 |
| 1k ohm reistor 1206 | 4 | Mouser | 290-1.0K-RC | 0.050 | 0.20 |
| 1nF ceramic capacitor 1206 | 1 | Mouser | 80-C1206C102K5R | 0.090 | 0.09 |
| 2.2k ohm resistor 1206 | 1 | Mouser | 263-2.2K-RC | 0.050 | 0.05 |
| 4 pin molex connector | 1 | Mouser | 538-15-24-4745 | 0.840 | 0.84 |
| 7805DT | 1 | Mouser | 863-MC7805CDTRKG | 0.470 | 0.47 |
| A9382 | 1 | Digi-Key | 620-1299-1-ND | 5.810 | 5.81 |
| Green LED 1206 | 1 | Digi-Key | 350-2053-1-ND | 0.238 | 0.24 |
| Red LED 1206 | 3 | Mouser | 645-598-8210-107F | 0.100 | 0.30 |
| RJ45 Jack | 2 | Mouser | 571-5555164-1 | 0.740 | 1.48 |
| Stepper Motor Drive V2.3 PCB | 2 | MakerBot | tv448 | 3.000 | 6.00 |
| 10 pin ribbon cable | 1 | Mouser | 523-191-2801-110FT | 0.470 | 0.47 |
| Subtotal: | 23.54 |
Dec 04, 2009
Hackerspace documentation states:
"The rule of thumb is 2+2. You need a partner to get the initial idea kicked off, making two of you. You need two more people in order to get real work done. Don’t start before you are at least four people. From this point it’s easy to recruit more people. Aim for ten people for a start."
Anyone else interested in setting one up in the the Pasadena/Arcadia/El Monte area of Los Angeles, California, USA.
The hackerspace wiki space can be found here
Dec 02, 2009
Most of the parts for building the 3rd generation Reprap electronics have arrived and the cost of the mother board is listed below. Too bad Makerbot is out of stock on their motherboard kit because it took hours spanning several days to order, receive, sort, and group all the parts from three different vendors. . . . and this is just for the motherboard, I haven't even started kitting together the 3 stepper motor drive boards.
| Part Name | Qty | Vendor | Vendor Part No | Cost | Ext Cost |
| .100 breakaway header | 6 | Mouser | 571-9-146304-0 | 0.086 | 0.513 |
| 1.8K ohm resistor 1206 | 5 | Mouser | 263-1.8K-RC | 0.050 | 0.250 |
| 10 pin female header | 4 | Digi-Key | S7008-ND | 0.458 | 1.832 |
| 10 pin IDC header | 4 | Mouser | 649-71600-010LF | 0.800 | 3.200 |
| 100nf ceramic capacitor 1206 | 3 | Mouser | 80-C1206C104K5R | 0.070 | 0.210 |
| 10K ohm resistor 1206 | 4 | Mouser | 290-10K-RC | 0.050 | 0.200 |
| 10uF electrolytic capacitor D55 | 1 | Mouser | 647-UUT1H100MCL1GS | 0.080 | 0.080 |
| 15pF ceramic capacitor 1206 | 2 | Mouser | 77-VJ12A100V150J | 0.060 | 0.120 |
| 16Mhz crystal | 1 | Mouser | 695-HC49US-16-U | 0.580 | 0.580 |
| 180 ohm resistor 1206 | 1 | Mouser | 263-180-RC | 0.050 | 0.050 |
| 1k ohm resistor 1206 | 2 | Mouser | 290-1.0K-RC | 0.050 | 0.100 |
| 3.3k ohm resistor 1206 | 3 | Mouser | 263-3.3K-RC | 0.050 | 0.150 |
| 30 ohm resistor 5W | 1 | Digi-Key | 30W-5-ND | 0.340 | 0.340 |
| 3M sd card socket | 1 | Mouser | 57-SD-RSMT-2-MQ | 1.300 | 1.300 |
| 4 pin female header | 4 | Digi-Key | S7037-ND | 0.383 | 1.532 |
| 4.7k ohm resistor 1206 | 2 | Mouser | 263-4.7K-RC | 0.050 | 0.100 |
| 6 pin IDC header | 1 | Mouser | 649-75869-131LF | 0.430 | 0.430 |
| Atmega644P tqfp | 1 | Digi-Key | ATMEGA65P-20AU-ND | 7.760 | 7.760 |
| ATX Motherboard header | 1 | Mouser | 538-39-29-3206 | 1.860 | 1.860 |
| Green LED 1206 | 1 | Digi-Key | 350-2053-1-ND | 0.238 | 0.238 |
| Omron B3F-1000 Button | 1 | Mouser | 653-B3F-1000 | 0.230 | 0.230 |
| RED LED 1206 | 1 | Mouser | 645-598-8210-107F | 0.100 | 0.100 |
| RJ45 Jack | 4 | Mouser | 571-5555164-1 | 0.740 | 2.960 |
| SN75176A SOIC | 1 | Mouser | 595-SN75176AD | 0.880 | 0.880 |
| SPDT switch | 1 | Mouser | 10SP001 | 0.380 | 0.380 |
| RepRap Motherboard V1.2 PCB | 1 | MakerBot | tv274 | 8.000 | 8.000 |
| Subtotal: | 33.395 |
Dec 01, 2009
 The GNU/Linux logo is a two color logo however the laser engraving is an monotone process. If a single power setting is used, the feet and mouth of the penguin will simple merge into one continuous blob. To achieve a gray tone effect, the laser power intensity can be adjusted as defined by the different color area of the logo. The logo is color separated into two separate colors.
 Dec 01, 2009
Taking the plunge head first into a shallow pool is the result of not reading through the reprap documentations more carefully.
I finally have the electronics portion of the extruder controller V2.2 assembled. . . I thought the initial reflow soldering was passable until I took some desoldering wicks to the SMT chips and took out almost half of the visible solders. Yicks!
Anyway so I have an assembled extruder controller V2.2 only to realize that the Arduino based reprap controller I was so fixated on is old gen2 technology. I've been itching to try out my Arduino board ever since I took the practical electro-mechanical class at ThePublicSchool. Unfortunately, the new gen3 electronics no longer uses Arduino as the main controller and instead uses Sanguino. Gen3 electronics is also "cleaner" looking with integrated power circuit from the main controller board to the peripheral boards such as as the extruder and stepper motor drive via RJ45 connectors.
Arduino, Sanguino what's the difference right? They're both AVR based with Sanguino having more I/O pins and memory. . . probably some other useful stuff as well but I'm still in the AVRTiny phase so that's as deep as my eyes can read and brain can absorb.
Going back to taking the plunge part. So I have the extruder controller with no way to test it. To get around that problem I ordered as many parts as I can to complete the electronics portion of the Repstrap build. Once all the components arrive I will give a cost summary for the electronics portion and start working on the Sanguino based motherboard.
Nov 16, 2009
Nov 08, 2009
Speed Test according to website speed test:
| Size | Load Time | Avg Speed/KB | |
| HostingRails | 1.63KB | 5.18s | 3.17s |
| bluehost | 4.6KB | 1.45s | 0.32s |
Oct 22, 2009
Oct 21, 2009


